| baseportal | ||
| Start | ||
| Easy Start |
Now the window of your browser is split: Here in the top frame, there is the "Easy start" with step by step instructions. In the bottom frame, there is the sign up page. You get there by clicking on "Sign up" on the homepage. In the following example, we will create a small "news system", step by step. This system will allow you to present news on your web page, fast and comfortably. You'll need about 5 minutes to do this... |
| Create an account | |
|
To access and maintain your database you have to create an account with a name and password: | |
| Fill out the fields as described... | 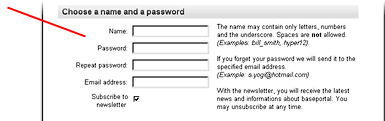 |
| ...read the terms of use and click here to agree... |  |
| ...and finally click on "Sign up" |  |
| Your first web database | |
Next you could choose an existing application template - however, if you want to learn something, you should create your own database: | |
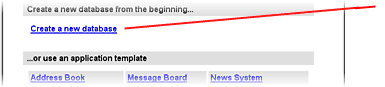 | Click here to create a new database |
| The first field | |
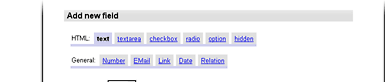
Let's get right down to business: You will define the fields of the database. For our news system we need the following fields: "Title", "Text", "Author"... Let's begin with the first field: | |
 | |
| Enter the field name: "Title" |  |
| Select the type of sorting: "Text" |  |
| Click on "Submit" |  |
| You may leave all other input fields like "Size", "Default" or "Password" empty, because baseportal automatically takes reasonable values, e.g. a size of 20 characters for a text field (This only determines the width of the input field - the input itself can be arbitrarily long).
|
| The next fields | |
After you have stored the first field, you'll receive a confirmation and a list of the fields already defined, in our case, only one entry. Now we define the next field. It is not a single-line input field but a text field of several lines:
| |
 | The field was stored successfully |
 | Here you see the field which was just defined, with the name, sorting, type and parameters |
 | Click on "textarea" to select the type of the next field |
Fill out the input fields for the second field:
|
 | |
| Enter the name of the second field: "Text" |  |
| Enter the columns of the text field: e.g. 50 |  |
| Enter the rows of the text field: e.g. 10 |  |
| Click on "Submit" |  |
And the second field is defined in the database. The third and last field is a single-line text field again: |
 | |
 | Here you see the second field. "Parameters" shows you the number of columns and rows |
 | Click on "text" in order to select the type of the third field |
Just enter the name of the last field and leave all other input fields empty: |
 | |
| Enter the name of the third field: "Author" |  |
| Click on "Submit" |  |
Very good! You defined all fields of the database. The complete field table looks like this:
|
|
| The next step | |
Let's go to the next step, the design of the database page. | |
 | |
| Click on "Next step" (at the bottom of the page) |  |
| Design | |
Now we have to design the web page with the output of our database. A quick way to do this is to use one of the existing design templates. However, to produce really satisfying content you should use HTML.
| |
 | You are on step 2: "Design" |
 | Click on "Do not use a template" |
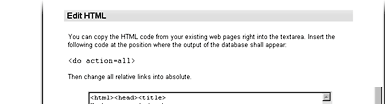
You can enter HTML code directly in the textarea. The important piece of code is <do action=all>. That's where the output of the database appears. |
 | |
| Insert <do action=all> before the following line: < h2>Interesting News</h2 > | 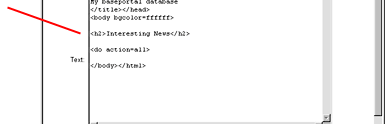 |
| Click on "Submit" |  |
|
| Settings | |
You control the database with some settings. The most important setting is definitely the rights assignment: Everyone may read the data of our news system (that's what news is for), but nobody may add, modify or delete the data except you. To let the newest messages appear on top of the page you have to reverse the order of the output.
| |
 | You are on step 3: "Settings" |
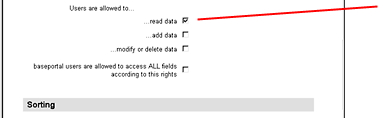 | This allows everybody to view the contents of the database |
 | Put a check at "Reverse output order?" |
That's all: |
 | |
| Click on "Next step" (at the bottom) |  |
| Enter Data | |
Great! You've created your first baseportal database - a small web-based news system! Take a look at how you enter new data:
| |
 | |
 | Follow the link "How to maintain my data?" |
| A new browser window opens and requests for sign in:
|
| The user name you chose |  |
| Enter the password you chose |  |
| Click on "Sign in" |  |
| A nearly empty page appears with a menu bar offering different possibilities. To enter new data select "New":
|
 | Click on "New" |
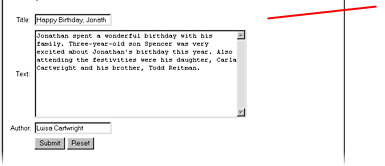
| An input form comes up with the defined database fields "Title", "Text" and "Author": |
 | |
| Enter a title for your first news |  |
| Enter a text, if necessary with blank lines |  |
| Enter an author |  |
| Click on "Submit" |  |
| Just make another entry (and another and another...):
|
 | The entry has been stored |
 | Fill out the fields and click on "Submit" |
| Read, modify and delete data | |
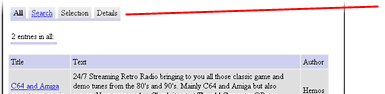
After you've made enough entries, you can access them...
| |
| Click on "All" |  |
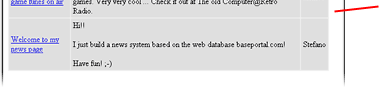
| ...and modify them, if necessary:
|
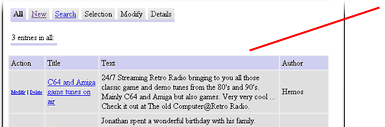 | Here you see the list of all records |
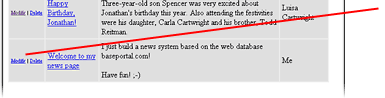 | Click on "Modify" at the desired entry |
| An input form appears, containing the data of the entry. Modifying is simple:
|
| Here you see that you modify an entry | 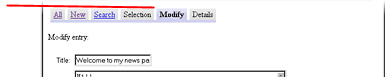 |
| Modify arbitrary fields. You can add new, delete old or modify existing data | 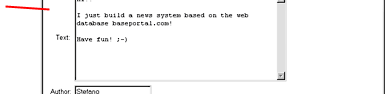 |
| Click on "Submit" |  |
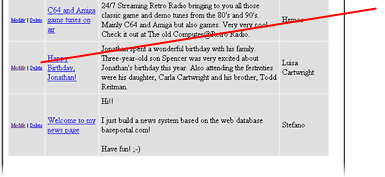
| The list of the entries appears again with the changed data. Removing an entry works with a single click:
|
 | The entry was changed |
 | The list with the changed entries |
 | Click on "Delete" at one of the entries |
| After a safety confirmation...
|
 | |
| The entry to be deleted |  |
| Click on "OK" |  |
| ... the entry has been removed from the database:
|
 | The entry was deleted |
 | The list with the remaining entries |
| Show data to visitors | |
Right now, only you are allowed to add or modify data. Visitors can only read the data. In order to see how this works, please go back to the window "Congratulations, you've created your first web-based database!"... | |
 | |
| Click on the link "To my database" |  |
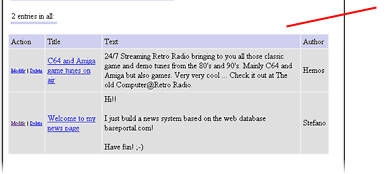
| Another window opens for the visitors of you page:
|
 | The menu bar contains no "New" or "Modify" |
 | The entries, without the possibility to "Modify" or "Delete" |
| Your Private Domain | |
Congratulations! We've reached the end of our small baseportal introductory course - you've successfully passed! ;-) However you've only learned a few of the possibilities baseportal can offer - there is still a lot to discover... Next time you come to baseportal you can sign in directly on the homepage:
| |
| Enter your user name. The check is case sensitive! |  |
| Enter your password |  |
| Click on "Sign in" |  |
| There you can get into your private domain, where you can change the design and the fields of your first database, import or export data, create new databases and pages and much, much more...
 We hope that this small introduction was helpful and we wish you: Much fun and success with baseportal! |
Back to the homepage
| © baseportal.com. All rights reserved.Terms of Use |